Friday, September 22, 2017

Semi-vintage Fender Jaguar


This is the Fender Jaguar I put together with some original vintage parts and some new.


Original 1965 neck

Original 1964 harness

Original 1964 knobs

New relic aged vintage style tuners

New alder body

I chose to get the guitar body at Guitar Mill because, as far as I know, it is the only one who makes Jaguar bodies with the exact specs of vintage ones, they are the exact replicas.

I painted the body using sanding sealer, Duplicolor white primer, Duplicolor stone white and Stewmac nitro lacquer.

This is the new body straight from the shop
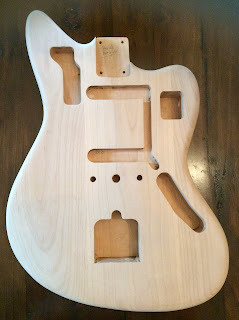
After applying the sanding sealer

After spraying the primer.

It took me more than one attempt to find the right color. I always used Duplicolor spray pait cans. I first used Olympic White and I founded it too cold so, I sanded everything off and redo all the passages. Then I ordered Wimbledon White, this time I tried first on another piece of wood and it was too yellow. I finally found the Stone White to be exactly what I was looking for, so I ordered 5 cans, tried on wood and... that was it!

White... what a pain! If you don't have a spray booth, like me, you'll find fibers coming from nowhere landing on your paint that you have to sand it off after each coat when dries. it was a long process but in the end it paid off.

For the paint and sanding process I followed meticolously the instructions I found on Stewmac website, then I tried to polish it myself by hand. It turned out just all right but I could still see too many sanding scratches so I decided to take it to a luthier who polished for me with the buffing machine. It turned out perfect.

Tips: if you'll ever need to use masking tape, DO NOT EVER use regular paint masking tape, blue, green or similar because that kind of tape yellows the finish, just go to an art painting supply shop and get an artist masking tape roll, it's white and it's worth to pay a few extra bucks for that. The chemicals in the art masking tape don't ruin your finish.
Another tip is, when you put a screw for the first time, make a smaller hole marking the drill bit with tape for depth, then coat the screw in was, doing so you build the thread in the wood.


When everything was ready, I put everything together. Everything was good and was working but it needed a professional setup, so I decided to take it again to a luthier. 
Here the bad news, the frets were ok but not very good, so I decided to refret the entire neck. It didn't turned out cheap because the frets that were used in the sixties used to have a shorter tang compared to the new ones. The longer tank of the new fret wires would brake the fretboard, so the luthier had to trim them in a T-shape before placing them.
The original nut was too low so, in order to save the original bone nut, the luthier used dentist tools to fix it! yes... he used the blue light too to harden the tooth compound, the one they use to reconstruct your teeth!!!


Strings... I put the classing surfing tone string set that people used in the sixties: Pyramid Gold 12-52 flatwound, excellent strings. I also find the Dogal to be excellent strings, they are hand made in Venice, Italy.
Bridge: Offset Mastery Bridge.


Resources:

Stewmac (on how to spray paint and finish your guitar)
Webmasterman (on how to solder properly guitar components)

Friday, September 15, 2017

1977 Twin Reverb Silverface - tube layout and more


After a good research in the web and "tube rolling", I came out with this tube layout. It sounds pretty amazing. The ones underlined are the ones currently in the amp.

V1 12ax7 = Preamp normal channel (NOS JAN-GE 12AX7WA or  new Tung-Sol)
V2 12ax7 = Preamp vibrato channel (NOS JAN-GE 12AX7WA or new Tung-Sol)
V3 12at7 = Reverb send/driver (NOS Mullard 12AT7WA / CV4024 or NOS JAN-Philips or new TAD)
V4 12ax7 = 1/2 Reverb recovery and 1/2 gain stage for vibrato channel (NOS JAN-GE 12AX7WA or new Tung-Sol)
V5 12ax7 = Vibrato (GT or JJ) no tone effect, any brand would work just fine
V6 12at7 = Phase inverter (NOS Mullard 12AT7WA / CV4024 or NOS JAN-Philips or new TAD)
V7 6L6 = Power tube 1 (NOS 6L6GT Svetlana "Winged C" or GE 6L6GC or new TAD)
V8 6L6 = Power tube 2 (NOS 6L6GT Svetlana "Winged C" or GE 6L6GC or new TAD)
V9 6L6 = Power tube 3 (NOS 6L6GT Svetlana "Winged C" or GE 6L6GC or new TAD)
V10 6L6 = Power tube 4 (NOS 6L6GT Svetlana "Winged C" or GE 6L6GC or new TAD)


If you don't use the channel 1 there is one interesting mod I found on fenderguru.com:

 Use normal channel for reverb control to adjust EQ and depth of reverb.

"This mod is relevant only for two-channel amps with normal and vibrato channel. This trick is great for the reverb enthusiasts among us, and who is not? Plug your guitar into the vibrato channel, then unplug the reverb return cable on the back of the amp (the one that comes from the reverb tank output)* and plug it into the normal channel input. You will need a converter to go from male phono/RCA jack to a 1/4″ male jack. You may now use the normal channel as a reverb control where you can adjust the depth and tone using the volume, bright switch, treble and bass knobs (and mid if you have a Twin Reverb). The reverb knob on the vibrato channel will have no effect any longer. This mod is not applicable together with the Pull V1 mod, as you need the normal channel preamp tube." Fender Guru

*Note: looking from the back it should be the one on the left side "reverb output", grey cable tip.


Another interesting mod I found on robrobinette.com:

Put a capacitor to reduce ice peaks highs.

"If your particular speakers are giving you too many 'ice pick' highs simply adding a 100pF Mica capacitor across the feedback resistor will filter out some very high freqs that can cause ice pick highs. The cap allows high freqs to go around the feedback resistor so they are used for feedback which will reduce them from the amp's output. This is a nice, subtle mod that won't screw up your silverface's perfect tone. It's easy to use alligator clips to clip the cap in place temporarily to see if you like the mod. If you would like to cut even more highs than the 100pF cap, you can go all the way up to a .022uF cap to lower the filter's cutoff freq so more mid-high freqs would be cut. There's a small chance the Ice Pick Cap can induce oscillation at high volume. If that happens you can put a 4.7k resistor in series with the cap to reduce the very high frequencies that cause oscillation... This is an Ice Pick Cap on a 5F6A Bassman but it works the same way in silverface amps. Just put the cap around the 820 ohm Negative Feedback resistor." Rob Robinette

On this video below there is another mod to reduce the loudness, power and weight of the amp without altering the sound, great if you don't play in big stages.

Resources:

Fender Guru
KCA NOS Tubes
The Tube Store

Friday, September 1, 2017

Yellow School Bus Factory - Sonic Lovers


Song from the new EP coming out soon "Architecture of a Spaceship".
Music and Lyrics by Davide Bortolato - Yellow School Bus Factory - with the exquisite participation of Francesco Candura at the bass. Recorded in the basement, mixed at the Sine Studios in Philadelphia PA, US , mastered at Abbery Road Studios, London, UK.
Edited video footage of Sheree North "Tiger Dance" from archive.org and liquid light projection I did in my studio.